>> Tuesday, June 27, 2017 –
Elizabeth Braun,
embroidery,
Japan threads,
Kreinik,
metallic thread embroidery,
metallic threads,
needlework,
wedding,
wedding dress
An embroidery adventure that ends with a wedding
What if the embroidery request challenged your skills by encompassing something you've never done? Whether you jump right in or struggle with your confidence as you start, a commission or special project is worth it. Blogger and stitcher Elizabeth Braun (http://sew-in-love.blogspot.com/) worked on such a project, making an embroidered panel for a friend's wedding dress. It's an embroidery adventure full of meaning, love, and embroidery tips to which we can all relate. Read on as we interview Elizabeth about the project.
Stitchery on clothing, with a twist
 ELIZABETH: No, this was a completely new type of
piece for me. I’d made a ring cushion before, but never done
anything so much part of an important occasion as this. Also, it was
my first piece of what one could call ‘couture embroidery’ as the
only stitchery I’ve done on clothes before has been a few basic
flowers on baby knitting projects. The other firsts for me were
working on fine netting and using water soluble stabilizer. So, yes,
‘an embroidery adventure’ is a good name for it!
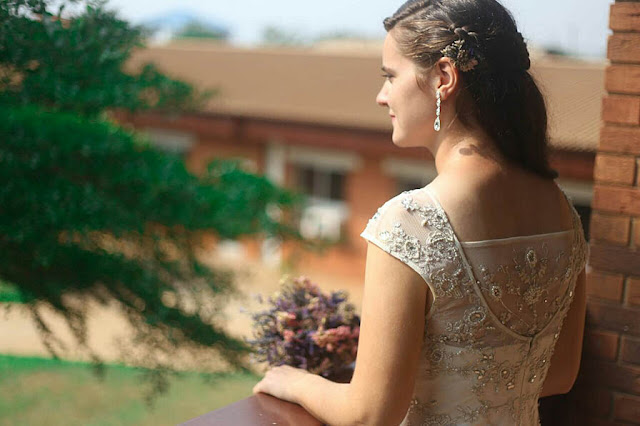
ELIZABETH: My young friend, Lauren had been living
in Ghana for a couple of years and was to
marry a local man in
December. She bought a beautiful dress, but, in her words “the
scoop at the back is too low, especially for Ghanaian culture (a
woman’s back is considered XXX in Ghana!!!). So my mum is going to
take some netting off the bottom and insert a panel in the top. We
have got some silver jewels and cream beads to be sewn sparsely onto
the panel in some kind of design to make it match. But it won’t
need to be too complex because it’s actually going to be mostly
under my hair…. Mainly for if my hair swooshes, everybody doesn’t
gasp with shock!” She asked for “just something matching-ish”
as the dress proper was fairly heavily embroidered and embellished,
and said that “anything is a bonus on bare netting.”
Even though it was never really meant
to be seen, I wanted to make it as good as I possibly could,
especially as I’d always been fond of Lauren and so loved the idea
of doing something like this for her. Also, I’m a bit of a
perfectionist and couldn’t really work with the idea of ‘just
anything’. Oddly enough, I’d find that harder to achieve than a
very precise design brief!
Challenge accepted: metallic threads on netting
Q: Which Kreinik threads did you use?
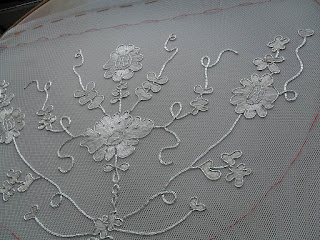
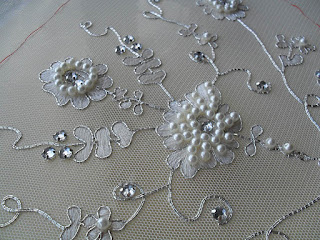
ELIZABETH: Japan threads in 001 (silver) matched
the embroidery on the dress proper perfectly, especially the #7
thread which I used for most of the silver work – couched down with
#1, as were the smaller lengths of #5 that lent themselves well to
the detail in the larger flower centres.
Q; What were the challenges—and
solutions—to working on netting?
ELIZABETH: Anyone who is used to working on
loosely woven linen will have an idea of the difficulties involved.
The netting was just a grid of tiny, cream hexagons and getting any
sort of detail on it would have been almost impossible without
stabilizer. Of course, unlike with something like linen, I couldn’t
just back it with muslin or calico as the whole of that part of the
dress was just embroidered net, so I used water soluble film to keep
the whole thing straight in the working hoop and to allow enough
stitches to be put in to make the shapes solid and stable enough.
Stitching on this film was a little bit
like embellishing a thin, plastic raincoat, it was rather an odd texture to work on! Once I had the design traced onto the net,
(another challenge – getting enough ink on to the fine filaments of
the netting so as to be able to see them clearly enough to work
with), I mounted them both into a 10” hoop, keeping the stabilizer
film fairly taut, but the net at its natural level of stretch bearing
in mind the needs of the ‘end user’. Couching down the silver
threads on net posed an extra problem as I needed to be sure to make
each couching stitch cross one of the net filaments in order for the
silver lines to be properly attached to the net. It would have been
all too easy to have them hanging off in places.
Once the embroidery was complete, the
stabilizer had to be removed. Thankfully, I’d done a couple of
samples as part of the design process and had learned how to (and how
not to) remove it thoroughly. This part was scary! I needed to snip
away the film fairly close to the motifs so as to leave relatively
little to get stuck in the silk satin stitches. If you leave any
behind, the motifs are really sticky and then dry encrusted - hard
and scratchy, so I wanted to minimize the risk of this. I was really
scared of snipping one of the net threads and ruining the whole
piece! Mercifully, that didn’t happen, but I did need to rinse the
panel twice and then flatten it thoroughly as the Japan threads twist
a lot when they get wet. (They dry much flatter though.)
Many of us share a similar start to our needlework lives
Q: Where, how, or when did you get
started doing embroidery?
ELIZABETH: I did some small projects as a child,
but got into embroidery as an adult when I was home with CFS back in
2002-2005. I needed something to do that would stop me feeling sorry
for myself and, as I gave most of the things I made to friends, it
also helped me to reduce the feelings of isolation so common with
long-term conditions. A Taiwanese friend had arranged for her cross
stitch magazine subscriptions to come via me after she went back, so
I looked through some of them and decided to give it a go myself. It
all started there and I’ve learned multiple techniques over the 15
years since then.
Q: What projects are you working on
now?
ELIZABETH: Embroidery-wise at the moment I have a
large cross stitch picture that I’ll be making up into a sofa
scatter cushion/pillow in slow progress and I have another two
projects hooped up to start – a rose thread painting and a meadow
scene freestyle. Nothing with metallics at the moment, but I do use
them in as many project as I can, because I just love the effect they
give.
Other than these, I’m busy knitting
for the babies that are expected in my group of friends this summer
and also making a start on knitting and sewing my own clothes for
next winter. I need pretty much all new things and I want clothes
that fit and that I actually love, so I’m going to do it myself.
One or two will feature embroidery.
Be inspired by this unique, meaningful, endearing project, whether you work on it solo or with a group (the Royal School of Needlework worked on Kate Middleton's dress, and three dozen seamstresses worked on Grace Kelly's wedding dress!). Read more about Elizabeth's adventures in sewing and stitching on her blog: http://sew-in-love.blogspot.com/
Photo credits:
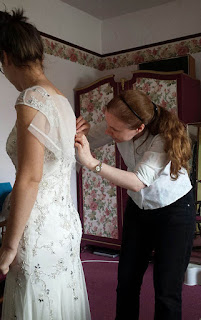
All the photos are copyright to Elizabeth Braun of Sew in Love Stitch Art, except the photo of tracing the panel (called ‘outlining panel’) which is courtesy of Janet Wellock, Halifax, England (i.e. the bride’s mum) and the photo of the beautiful bride one which is courtesy of Leonard Adjei for Benkowsky Photography, Accra, Ghana. All used by permission.


